
I’d like to introduce my service template for .NET Applications based on the Clean Architecture style. You can download the full source code or you can play with the dotnet new caju tool using the following commands:
$ dotnet new -i Paulovich.Caju::0.4.0
$ dotnet new clean \
  --data-access mongo \
  --use-cases full \
  --user-interface webapi
As the SOLID principles and the Clean Architecture rules are worth to write about it, I am starting this blogging series explaining the decisions we have made through the development of the Manga Project. Feedback are welcome! Clean Architecture expects at least 4 layers and in each layer there are common components. Starting with the layers from inside to the outer ones: 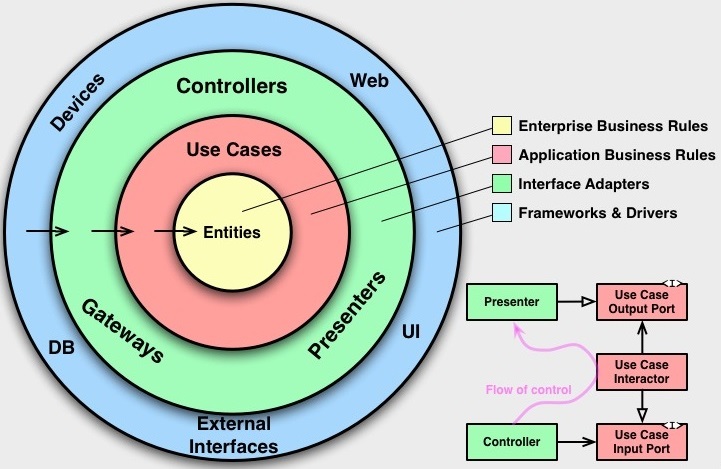
- Enterprise Business Rules
- Application Business Rules
- Interface Adapters
- Frameworks & Drivers
Let’s talk about on how we implemented this layers in the Manga Project!
1. Enterprise Business Rules
Beginning with the Enterprise Business Rules Layer we are talking about Aggregates, Entities, Value Objects and others patterns of a rich Domain. In our specific Bounded Context we have the Customer and the Account as Aggregate Roots, also the Credit/Debit transactions as Entities and last but no least we have the Name, Person Number and Amount as Value Objects. 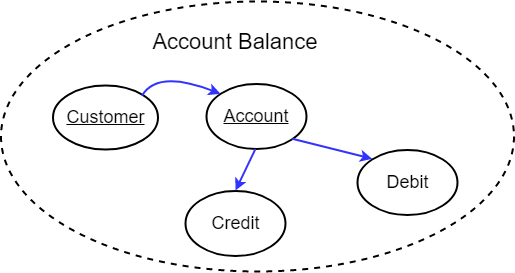 In short words, the previous components are the business entities that encapsulates fields and prevents unexpected changes or behaviors, these components maintain the application state in the most reliable way. Now, let me highlight some characteristics of this data structures:
- Aggregate Roots controls the entities graph and are used by repositories for data persistence. The software craftsman Vaugn Vernon wrote the rules for designing effective aggregates and I highly recommend watching the video Curing you Domain Model Anemia with Effective & Clean Tips from the Real World from Edson Yanaga these helped me a lot to enrich my model.
- You will see that majority of the classes have properties with private sets or protected sets in order to prevent unexpected state changes from the several clients along the Use Cases (we avoid public sets when possible).
- We had to make exceptions for constructors due of deserialization requirements.
- Value Objects are expected to be immutable and they have the most closed fields. Fields that change only when we create a new instance of the Value Object.
You can find interesting Domain Entities in our GitHub, following there are an Aggregate Root example:
public class Customer : Entity, IAggregateRoot
{
    public virtual Name Name { get; protected set; }
    public virtual PIN PIN { get; protected set; }
    public virtual int Version { get; protected set; }
    public virtual AccountCollection Accounts { get; protected set; }

    protected Customer()
    {
        Accounts = new AccountCollection();
    }

    public Customer(PIN pin, Name name)
        : this()
    {
        PIN = pin;
        Name = name;
    }

    public virtual void Register(Guid accountId)
    {
        Accounts = new AccountCollection();
        Accounts.Add(accountId);
    }
}
2. Application Business Rules
Let’s move to the Application Business Rules Layer that contains the Use Cases of our Bounded Context. As said by Uncle Bob in his book Clean Architecture:
Just as the plans for a house or a library scream about the use cases of those buildings, so should the architecture of a software application scream about the use cases of the application.
So our Use Cases implementations are first-class modules in the root of this layer. The shape of a Use Case is an Interactor object that receives an Input, do some work then pass the Output through the currently Presenter instance as shown in the following figure:  In the previous Flow of Control we have:
- An Action in the CustomersController calls a method in the RegisterInteractor with the RegisterInput data;
- The RegisterInteractor that implements **IInputBoundary
** calls the **CustomerRepository** passing the **CustomerAggregate** object created in that Use Case. - Then the RegisterInteractor generates a RegisterOutput data object (POCO) and passes it to the currently IOutputBoundary.
- The RegisterPresenter which implements IOutputBoundary receives the RegisterOutput and creates the RegisterModel.
- The RegisterModel created in step 4 are returned by the Action.
In our example application we have other Use Cases that allow Customer Registration and Bank Account transactions. In simple terms these are the Use Cases:
- Customer Registration.
- Get Customer Account Details.
- Get Account Details.
- Deposit to an account.
- Withdraw from an account.
- Close an account.
Continuing to explore our implementation you will see that the RegisterInteractor receives the services by DI. The Process method does the Application Business Rules, calls the Repository and at the end passes the RegisterOutput through the RegisterPresenter instance. Let’s take a look at the RegisterInteractor class:
public class RegisterInteractor : IInputBoundary
{
    private readonly ICustomerWriteOnlyRepository customerWriteOnlyRepository;
    private readonly IAccountWriteOnlyRepository accountWriteOnlyRepository;
    private readonly IOutputBoundary outputBoundary;
    private readonly IOutputConverter outputConverter;

    public RegisterInteractor(
        ICustomerWriteOnlyRepository customerWriteOnlyRepository,
        IAccountWriteOnlyRepository accountWriteOnlyRepository,
        IOutputBoundary outputBoundary,
        IOutputConverter outputConverter)
    {
        this.customerWriteOnlyRepository = customerWriteOnlyRepository;
        this.accountWriteOnlyRepository = accountWriteOnlyRepository;
        this.outputBoundary = outputBoundary;
        this.outputConverter = outputConverter;
    }

    public async Task Process(RegisterInput input)
    {
        Customer customer = new Customer(input.PIN, input.Name);

        Account account = new Account(customer.Id);
        Credit credit = new Credit(account.Id, input.InitialAmount);
        account.Deposit(credit);

        customer.Register(account.Id);

        await customerWriteOnlyRepository.Add(customer);
        await accountWriteOnlyRepository.Add(account, credit);

        CustomerOutput customerOutput = outputConverter.Map(customer);
        AccountOutput accountOutput = outputConverter.Map(account);
        RegisterOutput output = new RegisterOutput(customerOutput, accountOutput);

        outputBoundary.Populate(output);
    }
}
What have you seen until here is Enterprise + Application Business Rules enforced without frameworks dependencies or without database coupling. Every details have abstractions protecting the Business Domain to be coupled to tech stuff.
3. Interface Adapters
Now we advance to the next layer, at the Interface Adapters Layer we translate the User input in a way that the Interactors understands, it is good practice to do not reuse entities in this layer because it creates coupling, the front-end has frameworks, other ways of creating his data structures, different presentation for each field and validation rules. In our implementation we have the following components for every use case:
- Request: a data structure for the user input.
- A Controller with an Action: this component receives the user input, calls the appropriate Interactor which do some processing then pass the output through the Presenter instance.
- Presenter: it converters the Output to the Model.
- Model: this is the return data structure for MVC applications.
And this is how looks a Controller for the Register Use Case. We must highlight that the Controller knows which Interactor to call but it does not care about the Output of it, instead the Controller delegates the responsibility of generating a Model to the Presenter instance.
[Route("api/[controller]")]
public class CustomersController : Microsoft.AspNetCore.Mvc.Controller
{
    private readonly IInputBoundary<RegisterInput> registerInput;
    private readonly Presenter registerPresenter;

    public CustomersController(
        IInputBoundary<RegisterInput> registerInput,
        Presenter registerPresenter)
    {
        this.registerInput = registerInput;
        this.registerPresenter = registerPresenter;
    }

    /// <summary>
    /// Register a new Customer
    /// </summary>
    [HttpPost]
    public async Task<IActionResult> Post([FromBody]RegisterRequest message)
    {
        var request = new RegisterInput(
           message.PIN, message.Name, message.InitialAmount);
        await registerInput.Process(request);
        return registerPresenter.ViewModel;
    }
}
An Presenter class is detailed bellow and it shows a conversion from the RegisterOutput to two different ViewModels. One ViewModel for null Outputs and another ViewModel for successful registrations.
public class Presenter : IOutputBoundary<RegisterOutput>
{
    public IActionResult ViewModel { get; private set; }
    public RegisterOutput Output { get; private set; }

    public void Populate(RegisterOutput response)
    {
        Output = response;

        if (response == null)
        {
            ViewModel = new NoContentResult();
            return;
        }

        List<TransactionModel> transactions = new List<TransactionModel>();

        foreach (var item in response.Account.Transactions)
        {
            var transaction = new TransactionModel(
                item.Amount,
                item.Description,
                item.TransactionDate);

            transactions.Add(transaction);
        }

        AccountDetailsModel account = new AccountDetailsModel(
            response.Account.AccountId,
            response.Account.CurrentBalance,
            transactions);

        List<AccountDetailsModel> accounts = new List<AccountDetailsModel>();
        accounts.Add(account);

        Model model = new Model(
            response.Customer.CustomerId,
            response.Customer.Personnummer,
            response.Customer.Name,
            accounts
        );

        ViewModel = new CreatedAtRouteResult("GetCustomer",
            new { customerId = model.CustomerId },
            model);
    }
}
4. Frameworks & Drivers
Our more external layer is the Frameworks & Drivers who implements Data Base Access, Dependency Injection Framework (DI), JSON Serializer and technology specific stuff. It has an CustomerRepository implementation. See the GitHub for the MongoContext and other Repositories classes.
public class CustomerRepository : ICustomerReadOnlyRepository, ICustomerWriteOnlyRepository
{
    private readonly Context mongoContext;

    public CustomerRepository(Context mongoContext)
    {
        this.mongoContext = mongoContext;
    }

    public async Task Get(Guid customerId)
    {
        Customer customer = await mongoContext.Customers
            .Find(e => e.Id == customerId)
            .SingleOrDefaultAsync();

        return customer;
    }

    public async Task Add(Customer customer)
    {
        await mongoContext.Customers
            .InsertOneAsync(customer);
    }

    public async Task Update(Customer customer)
    {
        await mongoContext.Customers
            .ReplaceOneAsync(e => e.Id == customer.Id, customer);
    }
}
We group the DI by Autofac Modules and created rules for selecting the interfaces and implementations by namespace patterns.
public class InfrastructureModule : Autofac.Module
{
    public string ConnectionString { get; set; }
    public string DatabaseName { get; set; }

    protected override void Load(ContainerBuilder builder)
    {
        builder.RegisterType()
            .As()
            .WithParameter("connectionString", ConnectionString)
            .WithParameter("databaseName", DatabaseName)
            .SingleInstance();

        //
        // Register all Types in Manga.Infrastructure
        //
        builder.RegisterAssemblyTypes(typeof(OutputConverter).Assembly)
            .AsImplementedInterfaces()
            .InstancePerLifetimeScope();
    }
}
And finally everything is tied together with configurations in the autofac.json which also makes possible to change implementations easily:
{
  "defaultAssembly": "Manga.Infrastructure",
  "modules": [
    {
      "type": "Manga.Infrastructure.Modules.WebApiModule",
      "properties": {
      }
    },
    {
      "type": "Manga.Infrastructure.Modules.ApplicationModule",
      "properties": {
      }
    },
    {
      "type": "Manga.Infrastructure.Modules.InfrastructureModule",
      "properties": {
        "ConnectionString": "mongodb://10.0.75.1:27017",
        "DatabaseName": "Manga-V01"
      }
    }
  ]
}
Summing up, we separated the Solution in projects so we could draw boundaries between the modules, clarify the dependencies and we have small classes that makes easy to create new features without changing the existing ones. These are the Solution Explorer in Visual Studio 2017:  And to help you understand the dependencies between the projects this diagram:
  Finally, as we did not cover every detail in source code take a look at.
git clone https://github.com/ivanpaulovich/manga.git
cd manga/source/WebAPI/Manga.WebApi
dotnet run
Or by:  I hope that this template could improve your productivity in building applications with evolutionary architecture.
Updates
I changed the installation and template generation command lines.